What’s the first thing that comes to your mind when you hear "mocking"?
Is it an expression when you laugh by making fun of something? Well, If yes, don’t worry you are not alone as I thought the same initially. But, with time I understood the meaning of mocking concerning testing. So, let’s unfold the concepts of Mocking one by one for you.
We know testing is important because if there are any bugs or errors in the software, they can be identified early and fixed before the software product is in the production stage.
But, Unit tests are designed to test the behaviour of specific classes or methods without depending upon the behaviour of their dependencies like databases. Since we’re testing the smallest “unit” of code, we don’t need to use actual implementations of these dependencies, and this is where the concept of test doubles as mocks arise.
What are Mocks and Mocking Frameworks?
Mocks are clones of the real object in testing, (For example, a clone of the live database). They hold some predefined data and provide them to answer the calls during testing.
Mocking frameworks are used to generate replacement objects like Mocks. By isolating the dependencies, they help the unit testing process and help developers in writing more focused and concise unit tests. The tests also perform faster by truly isolating the system under test. Thus, to make our life easy, we have frameworks like Keploy and Mockito.
What is Mockito🍹?
- Mockito is a java-based mocking framework that is used to create simple test APIs for performing unit testing of Java applications.
- The framework allows the creation of test doubles objects in automated unit tests for test-driven development.
- Mockito has an implementation for Kotlin and Scala too.
Consider an example of Spring Boot (a java-based framework) app, to understand the working of Mockito.
Every web application has an n-tier architecture to divide the application into physical tiers and logical layers. Similarly, a Controller-Service-Repository pattern is prevalent in Spring Boot applications.
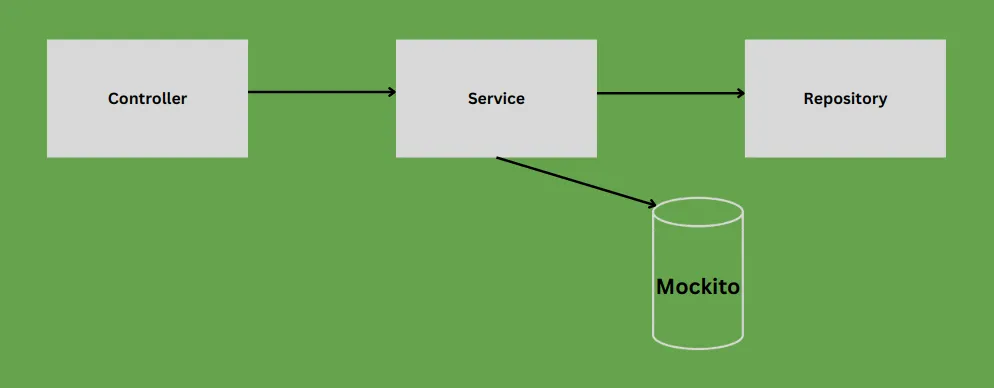
- Controller layer: It is responsible for defining the functionality so that it can be consumed.
- Service layer: It is dedicated to implementing the business logic of the functionality defined at the Controller layer.
- Repository layer: It maintains the property of data storage and fetching data.
Whenever a unit of software is called, it first hits the Controller to find the functionality, the request is forwarded to the Service layer for implementation of the called unit and the data if required to be fetched, it hits the Repository layer.
Now you know what mocks are, so, when a function here is called, it hits the Controller and passes the request to the Service layer and then the mocks created using a framework like Mockito are used for testing.
With Mockito, we create a mock and tell Mockito what to do when specific methods are called on it, and then use the mock instance in the test instead of the real dependency. After the test, we can query the mock to see what specific methods were called.
A sample application with OkHttp library implementing Mockito
Let’s consider an application that uses the OkHttp library to make requests and then retrieve the responses.
We’ll use two different URL’s to pass as requests:
Let’s start by creating a maven project in your preferred IDE, I’ll be using Eclipse. Continue by adding all the needed dependencies to the pom.xml file as shown below.
    <dependencies>
        <dependency>
            <groupId>com.squareup.okhttp3</groupId>
            <artifactId>okhttp</artifactId>
            <!--<version>4.10.0</version>-->
            <version>3.14.9</version>
        </dependency>
        <dependency>
            <groupId>junit</groupId>
            <artifactId>junit</artifactId>
            <version>4.13.2</version>
            <scope>test</scope>
        </dependency>
        <dependency>
            <groupId>org.mockito</groupId>
            <artifactId>mockito-all</artifactId>
            <version>2.0.0-beta</version>
            <scope>test</scope>
        </dependency>
        <dependency>
            <groupId>org.mockito</groupId>
            <artifactId>mockito-core</artifactId>
            <version>5.3.0</version>
            <scope>test</scope>
        </dependency>
    </dependencies>
Let’s begin by creating a HttpCall class under src/main/java. The HttpCall class has two methods named getResponse() and getResponse2() that make HTTP requests and return the response body as a String. The constructor initializes the client variable declared as an instance of OkHttpClient.
package org.example;

import okhttp3.OkHttpClient;
import okhttp3.Request;
import okhttp3.Response;

public class HttpCall {
    private OkHttpClient client;

    public HttpCall() {
        this.client = new OkHttpClient();
    }

    public void setClient(OkHttpClient client) {
        this.client = client;
    }

    public String getResponse2() throws Exception {
        Request request = new Request.Builder()
                .url("http://google.com")
                .get()
                .build();

        try (Response response = client.newCall(request).execute()) {
            int responseCode = response.code();
            System.out.println("Response Code : " + responseCode);
            assert response.body() != null;
            String responseBody = response.body().string();
            System.out.println(responseBody);
            return responseBody;
        } catch (Exception exception) {
            System.out.println(exception);
        }
        return "";
    }

    public String getResponse() throws Exception {
        Request request = new Request.Builder()
                .url("http://example.com")
                .get()
                .build();

        try (Response response = client.newCall(request).execute()) {
            int responseCode = response.code();
            System.out.println("Response Code : " + responseCode);
            assert response.body() != null;
            String responseBody = response.body().string();
            System.out.println(responseBody);
            return responseBody;
        } catch (Exception exception) {
            System.out.println(exception);
        }
        return "";
    }

    public static void main(String[] args) throws Exception {
        HttpCall httpCall = new HttpCall();
        httpCall.getResponse();
        httpCall.getResponse2();
    }
}
setClient() method sets the "client" variable to the passed-in OkHttpClient object.
Let’s now talk about our two major methods which will be responsible for making requests,
- getResponse() method creates a new HTTP GET request to the URL “http://example.com” using the
Request.Builderclass from OkHttp. The request is executed using the “client” object’s newCall() method and the response is retrieved as a Response object. - getResponse2() method is similar to the getResponse() method, but it requests the URL “http://google.com“.
Lastly, under the main() method, we create an instance of the HttpCall class and call both getResponse() and getResponse2() methods on it.
It’s time to mock our responses using Mockito…
Let’s create another class named as HttpCallTest inside src/test/java, which will be a unit test for a class called HttpCall using the JUnit and Mockito frameworks.
import okhttp3.*;

import org.example.HttpCall;
import org.junit.*;
import org.mockito.*;

import java.io.IOException;

import static org.mockito.Mockito.*;

public class HttpCallTest {
    private HttpCall httpCall;
    private OkHttpClient client;

    @Before
    public void setUp() {
        client = mock(OkHttpClient.class);
        httpCall = new HttpCall();
        httpCall.setClient(client);
    }

    @Test
    public void testGetResponse() throws Exception {
        Request request = new Request.Builder()
                .url("http://example.com")
                .get()
                .build();

        Response response = new Response.Builder()
                .request(request)
                .protocol(Protocol.HTTP_1_1)
                .code(200)
                .message("")
                .body(ResponseBody.create(MediaType.parse("text/plain"), "response body"))
                .build();

        when(client.newCall(request).execute()).thenReturn(response);

        String responseBody = httpCall.getResponse();

        verify(client).newCall(request).execute();

        Assert.assertEquals("response body", responseBody);
    }

    @Test
    public void testGetResponse2() throws Exception {
        Request request = new Request.Builder()
                .url("http://google.com")
                .get()
                .build();

        Response response = new Response.Builder()
                .request(request)
                .protocol(Protocol.HTTP_1_1)
                .code(200)
                .message("")
                .body(ResponseBody.create(MediaType.parse("text/plain"), "response body"))
                .build();

        when(client.newCall(request).execute()).thenReturn(response);

        String responseBody = httpCall.getResponse2();

        verify(client).newCall(request).execute();

        Assert.assertEquals("response body", responseBody);
    }
}
We have created a setup() method which is called before each test method and creates a mock OkHttpClient object which is then set as the client for the HttpCall instance.
The testGetResponse() and testGetResponse2() methods are responsible for testing getResponse() and getResponse2() methods of the HttpCall class, respectively.
In these methods, a mock HTTP request is created using the OkHttp Request.Builder and expected responses are created using the Response.Builder which is responsible for providing the dummy data needed to generate mocks and test behaviour.
when() method of the Mockito framework is used to specify that the execute() method of the mock client should return the expected response when given the mock request.
Now, to verify that the execute() method of the mock client was called with the mock request or not we use the verify() method.
Then finally, the Assert.assertEquals() method is used to compare the actual response body returned by the getResponse() or getResponse2() method with the expected response body.
Now, run the file as a JUnit configuration by setting the correct classpath. The details of the execution will be shown on your console.

But still, we are needed to write a long test script providing the dummy data for the generation of mocks. This is too much, right? Can this be eased? The answer is Yes. Let’s check out Keploy.
Auto-generation of Mocks using Keploy 🐰
KEPLOY is an e2e test generation platform, responsible for generating mocks and test cases automatically by making API calls. It eliminates the need of writing long test scripts and mocks and even escalates the test coverage to nearly double.
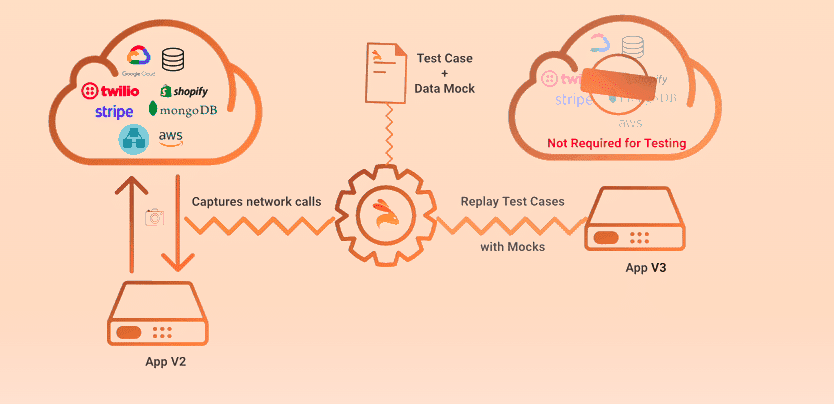
Keploy has a Java SDK and it supports frameworks like Spring Boot, SQL Driver, DynamoDB, PostgreSQL, OracleDB, MariaDB and many more.
With Keploy, you set the server in record mode and make a few API calls which will record the test cases from request, and response and mocks the dependencies used. These test cases can be replayed anytime later. Now, if we stop the application server, then in the absence of the dependency too, we’ll able to generate test runs with increased coverage.
Integrate Keploy into your application
- To start with build configuration by adding keploy-sdk as a dependency in pom.xml and sync the dependencies to build.gradle:
<dependency>
     <groupId>io.keploy</groupId>
     <artifactId>keploy-sdk</artifactId>
     <version>1.2.8</version>          <!--  use latest release -->
</dependency>- Download the latest jar from here (eg: 1.2.8) to mock external/internal dependency calls like DB queries, GMaps, S3, etc. Add the jar into the
maindirectory- Add
-javaagent:prefix with absolute classpath of Keploy jar downloaded through either of 3 ways:--
Using Intellij
Go toEdit Configuration->add VM options-> paste-javaagent:/Users/jhon/project/src/main/agent-1.2.8.jar->OK. -
Using Command Line
export JAVA_OPTS=”$JAVA_OPTS -javaagent:/Users/jhon/project/src/main/agent-1.2.8.jar” -
Running via Tomcat Server
export CATALINA_OPTS=”$CATALINA_OPTS -javaagent:/Users/jhon/project/src/main/agent-1.2.8.jar”
-
- Add
Mocking OkHttp calls with Keploy
Java-SDK supports the mocking feature for unit tests, where you write your unit test cases and use Keploy-generated mocks(kmocks) as stubs.
We’ll take the same example as taken for the Mockito, but we’ll do slight changes in the classes,
- Let’s remove the dependencies for Mockito from
pom.xmland add for Keploy-SDK as shown above. - In
HttpCall class, removed the setClient() method as it will no longer be required when we write a JUnit test for this call. Also, a default constructor for HttpCall will work. After making changes, the Class will look as shown below.package org.example; import okhttp3.OkHttpClient; import okhttp3.Request; import okhttp3.Response; public class HttpCall { public HttpCall() { } public String getResponse2() throws Exception { OkHttpClient client = new OkHttpClient(); Request request = new Request.Builder() .url("http://google.com") .get() .build(); try (Response response = client.newCall(request).execute()) { int responseCode = response.code(); System.out.println("Response Code : " + responseCode); assert response.body() != null; String responseBody = response.body().string(); System.out.println(responseBody); return responseBody; } catch (Exception exception) { System.out.println(exception); } return ""; } public String getResponse() throws Exception { OkHttpClient client = new OkHttpClient(); Request request = new Request.Builder() .url("http://example.com") .get() .build(); try (Response response = client.newCall(request).execute()) { int responseCode = response.code(); System.out.println("Response Code : " + responseCode); assert response.body() != null; String responseBody = response.body().string(); System.out.println(responseBody); return responseBody; } catch (Exception exception) { System.out.println(exception); } return ""; } public static void main(String[] args) throws Exception { HttpCall httpCall = new HttpCall(); httpCall.getResponse(); httpCall.getResponse2(); } } - Let’s write a fresh JUnit test importing MockLib Class of Keploy-SDK which is responsible for the auto-generation of mocks.
import io.keploy.service.mock.MockLib;
import org.example.HttpCall;
import org.junit.Test;

import static org.junit.Assert.assertTrue;

public class HttpCallTest {
    @Test
    public void testHttpCall() throws Exception {
        new MockLib("example test 2");

        HttpCall httpCall = new HttpCall();
        String response = httpCall.getResponse();
        if (response != null) {
            assertTrue(true);
        }
        assert response != null;
        assertTrue(response.contains("example"));
    }

    @Test
    public void testHttpCall2() throws Exception {
        new MockLib("google test 2");

        HttpCall httpCall = new HttpCall();
        String response = httpCall.getResponse2();
        if (response != null) {
            assertTrue(true);
        }
    }
}
In testHttpCall() method, a MockLib object is created with the argument "example test 2". Then, an instance of HttpCall is created and the getResponse() method is called, which should return a response from an HTTP GET request to "http://example.com". If the response is not null, the test passes. Additionally, the test asserts that the response is not null and contains the string "example".
Similarly, in testHttpCall2() method, a MockLib object is created with the argument "google test 2". which accounts for calling getResponse2() method, and should return a response from an HTTP GET request to "http://google.com". If the response is not null, the test passes.
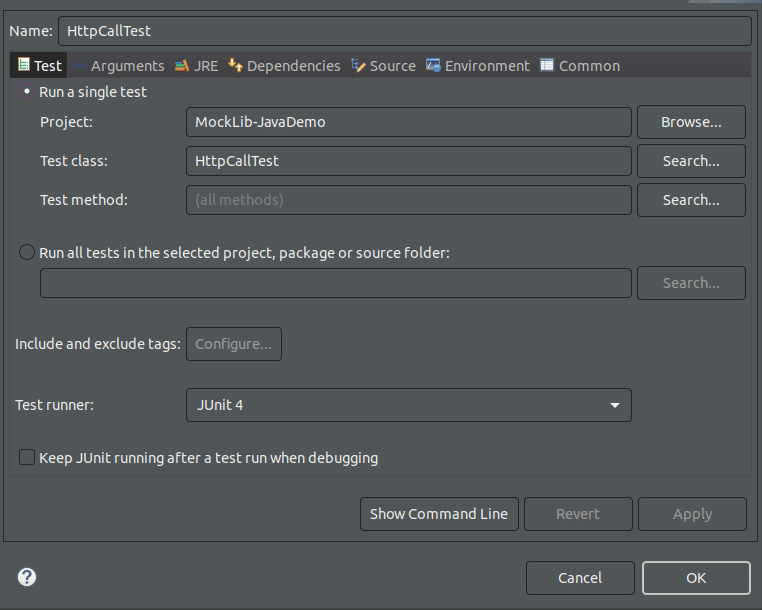
Let’s quickly set the configuration for running the file as JUnit,
Right-click on the HttpCallTest class from the project structure and go to Properties>Run/Debug Settings and create an instance of JUnit run configuration.
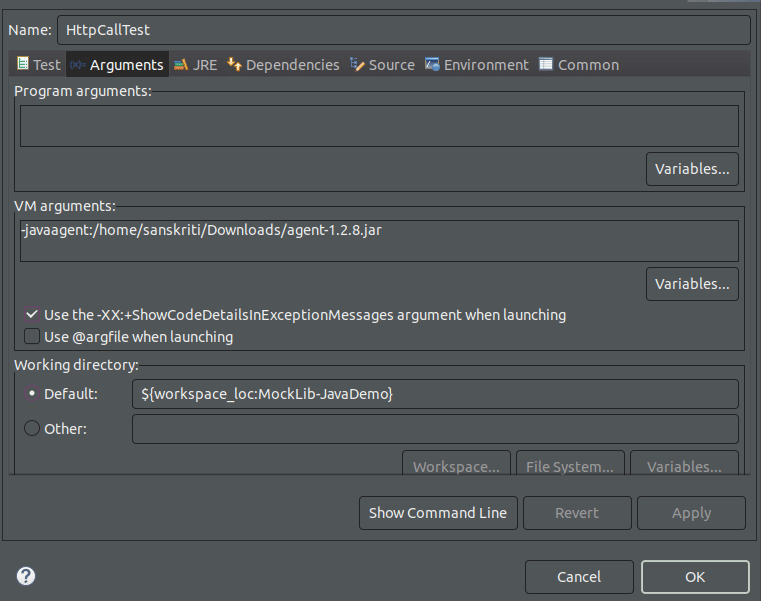
- Set the VM arguments by setting the path of the jar file to
javaagent.
- Lastly, set the environment variable KEPLOY_MODE as record to record the mocks when the test class is executed.
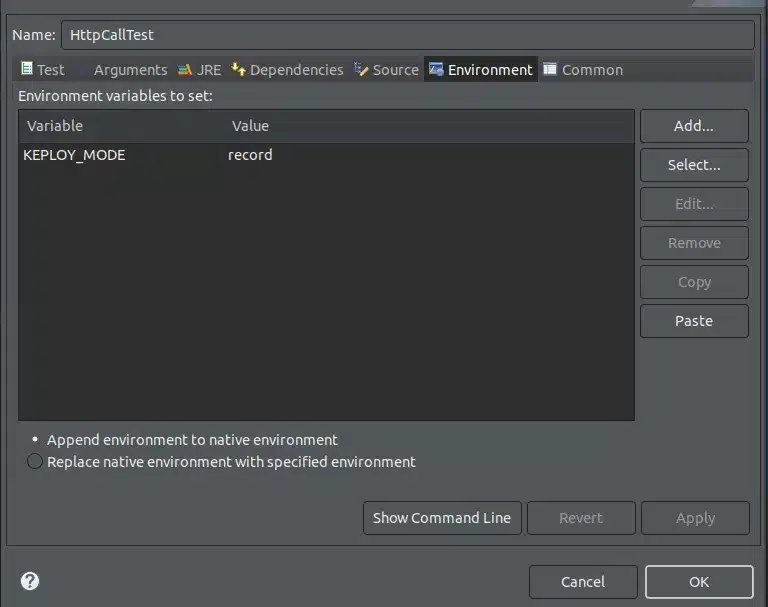
Let’s run the test file along with the configuration set and make sure that Keploy Server is running in the background.

As a result, the mock files will be captured and generated under src/test/e2e/mocks.
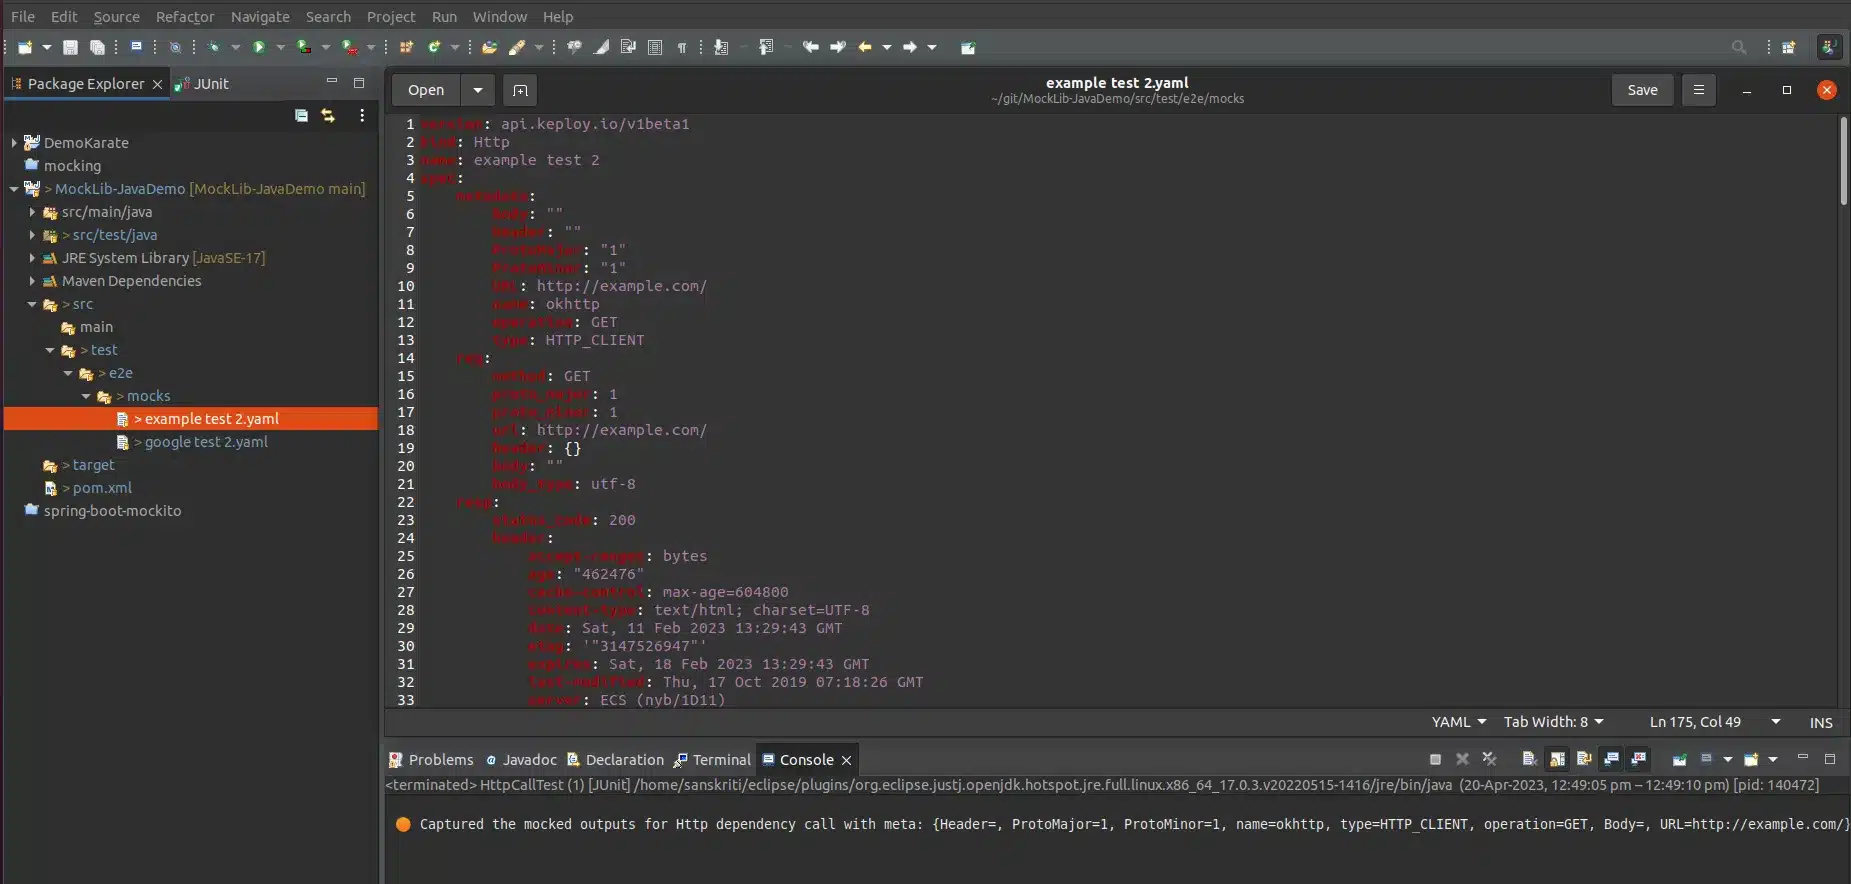

🤩 See, we didn’t even need to create a stub for our unit test cases, it’s all generated using the java-sdk mock library.
To know more about how to run Keploy java-sdk using one of our sample applications, refer to this video.
Keploy🐰 Vs Mockito🍹
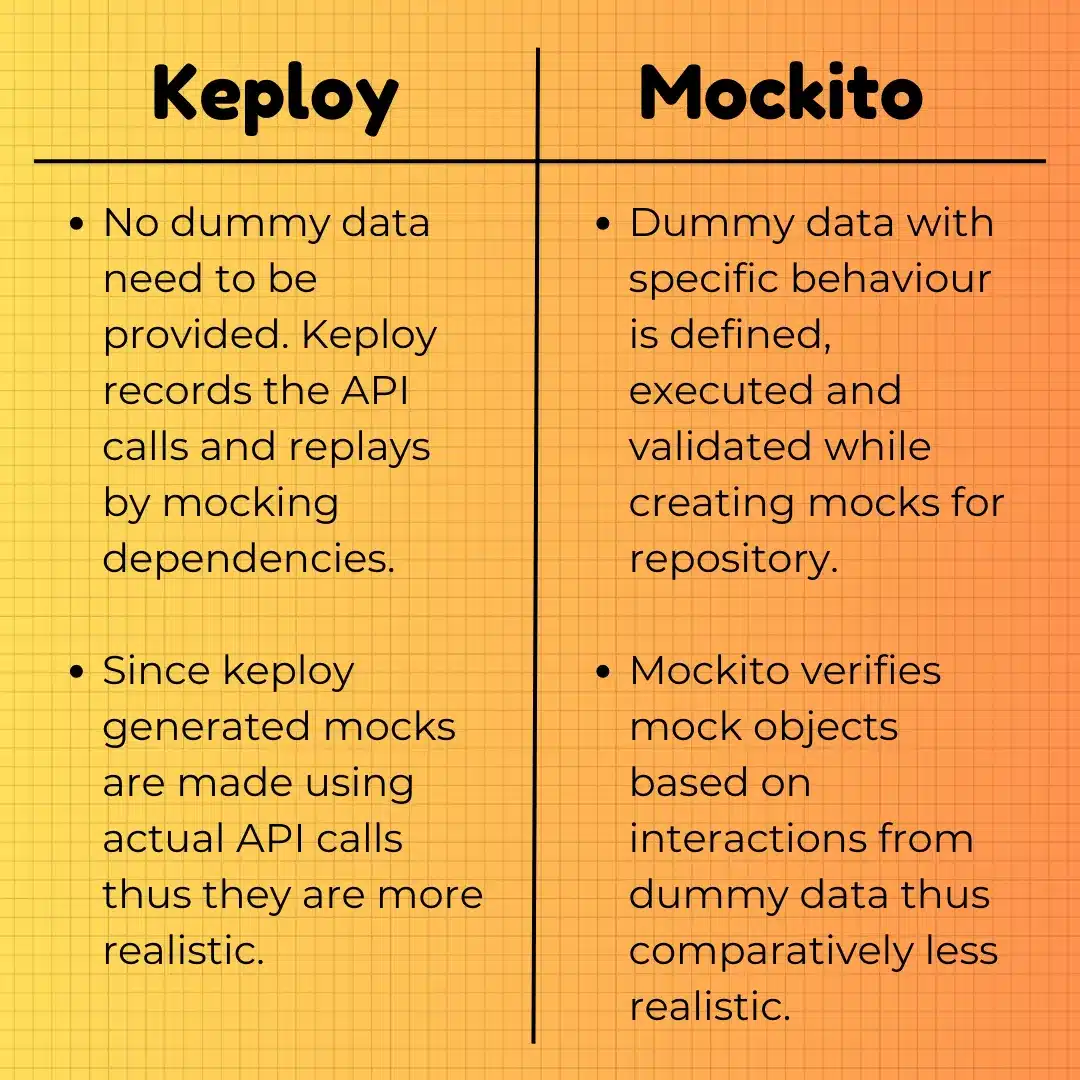
Yayy🎉! You have reached the end of this blog. Thank you for sticking to the last. I hope you were able to understand,
- What Mocking is?
- Why Mocking is necessary?
- How Mockito functions for simple Http client example?
- How keploy creates mock for OkHttp Client?
- What are the key differences between using Keploy and Mockito?
It felt amazing to be a part of your learning journey 🤍.


Leave a Reply