Visual regression tests have effectively enhanced the consistency of the UI maintenance by teams. It improves the quality of the user experience, lowers the possibility of UI bugs in production, saves hours of manual quality assurance activities by automatically detecting unintentional visual changes in web applications.
This blog will give an overview of visual regression testing, and we would discuss its functionalities, common testing procedures, types of tools available and how you can apply them to real time situations.
What is Visual Regression Testing?
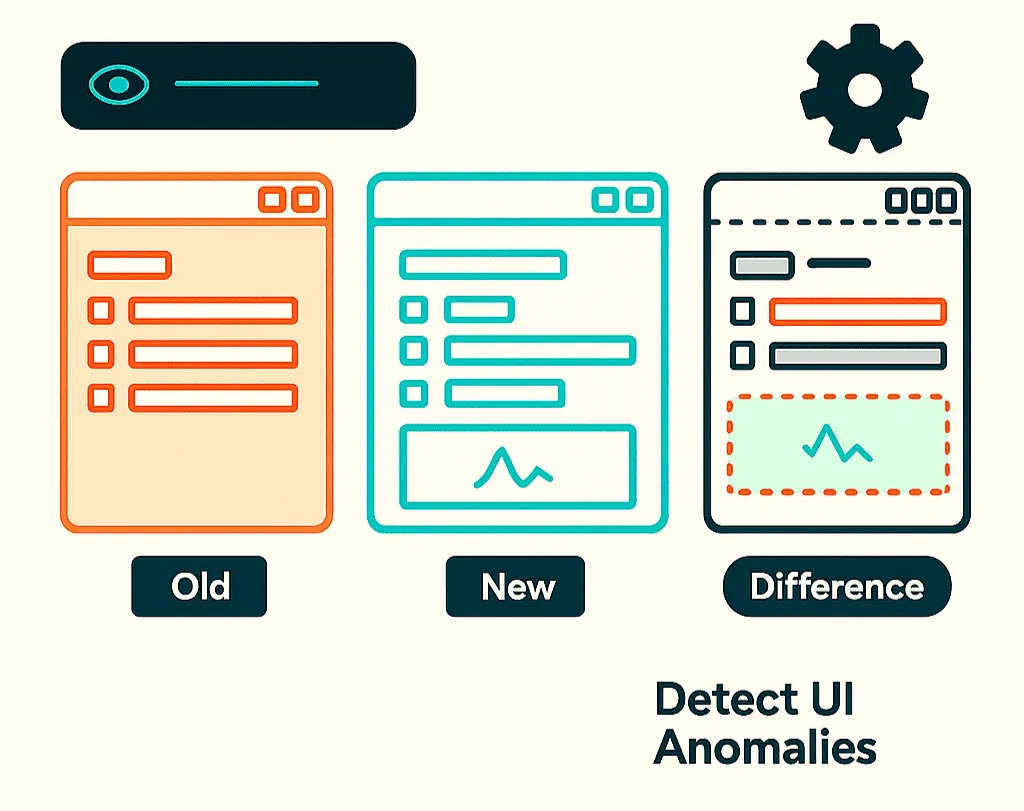
Visual Regression Testing (VRT) is a quality control mechanism that determines the difference in the graphical changes and anomalies in an interface. It compares the screenshots of the new version of the application to older official versions of the application to find changes.

It takes snapshots of your application and runs a pixel-by-pixel check with reference photos to identify even the slightest change of appearances. That is the magic: your unit tests will make sure your implementations are correct and your calculateTotal() returns what it is supposed to be.
javascript
// Your functional test might pass this:
expect(calculateTotal(cart)).toBe(99.99);
Output:

Visual regression testing will make sure that the screen is in the proper position, properly styled, and it does not block your checkout button.
Why Visual Regression Testing is Important
Truth be told, there is a Manhattan-sized blind spot in visual-related issues with traditional testing. you may be receiving perfect data, your logic may be rock solid, but when your UI resembles a product of a blender, it all goes away.
Visual regression testing isn’t just about aesthetics. It’s about:
-
User Experience Consistency: With this, it will see to it that your application looks and feels the same on different browsers and devices
-
Brand Protection: Having an appearance of homogenous similarity to secure a brand identity
-
Accessibility Compliance: Capturing visual alteration that could affect the accessibility criteria
-
Performance Impact: defining visual alterations that can be signs of performance backsliding
Techniques for Visual Regression Testing
1. Pixel-by-Pixel: This even compares pixel-to-pixel between two screenshots, very accurate, but will increase the false positives.
2. DOM Snapshot Testing: Takes screenshots of DOM structure instead of its looks.
3. CSS Snapshot Testing: Shows the differences in style, which assists in visual bugs when CSS is modified.
How Do Visual Regression Tests Actually Work?

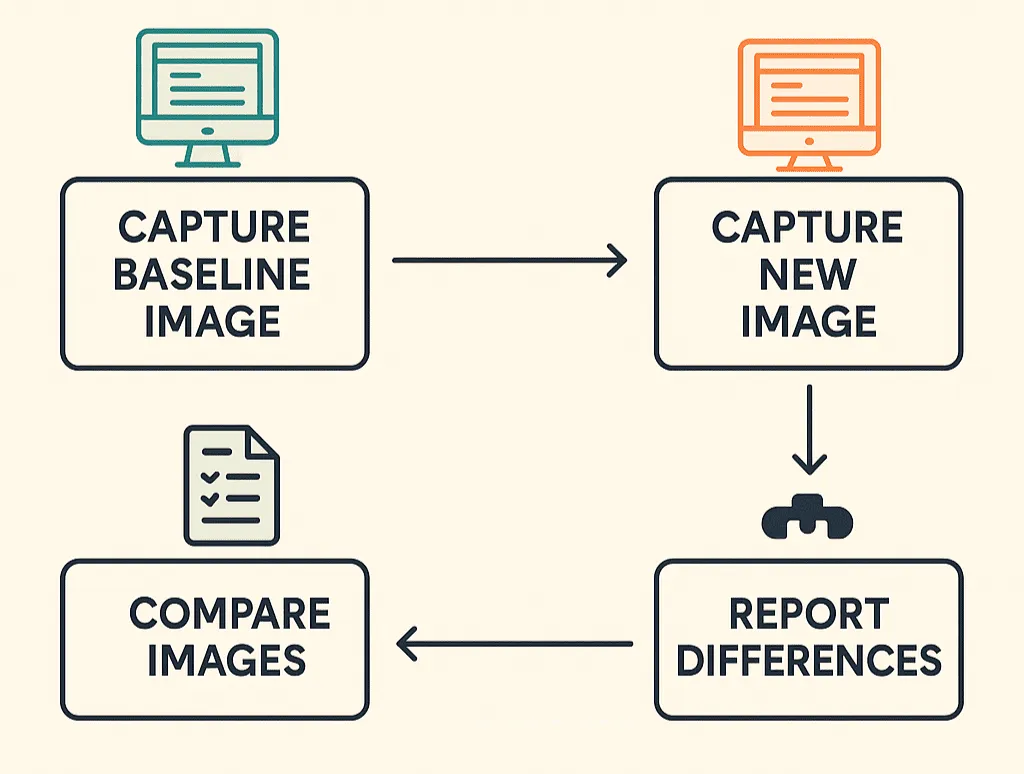
Step 1: Baseline Creation First, you can take references screenshots of your application being in its correct state. These become your golden master images.
Step 2: Test Execution With every test run, new screenshots are taken according to the use of the same conditions (same browser, viewport, etc.).
Step 3: Intelligent Comparison Advanced algorithms match the new screenshots with the baselines, taking into consideration allowable variations, but raising the flag on large changes.
Step 4: Diff Generation In case of differences, the tool creates visual diff reports that shows what changed precisely.
Real-World Example:
javascript
// Using Playwright for visual testing
import { test, expect } from '@playwright/test';

test('homepage visual regression', async ({ page }) => {
  await page.goto('/');
  await page.waitForLoadState('networkidle');

  // Capture and compare against baseline
  await expect(page).toHaveScreenshot('homepage.png');
});

test('responsive design check', async ({ page }) => {
  await page.setViewportSize({ width: 375, height: 667 });
  await page.goto('/');

  await expect(page).toHaveScreenshot('mobile-homepage.png');
});
Output:

Pro Techniques for Visual Regression Testing
1. Component-Level Testing
Instead of testing entire pages, focus on individual components. This approach reduces flakiness and makes it easier to pinpoint issues.
javascript
// Test individual components
test('navigation component', async ({ page }) => {
  await page.goto('/style-guide');
  const nav = page.locator('[data-testid="navigation"]');
  await expect(nav).toHaveScreenshot('navigation.png');
});
Output:

2. Smart Masking
Mask dynamic content that shouldn’t affect visual tests:
javascript
test('product page without dynamic content', async ({ page }) => {
  await page.goto('/product/123');

  // Mask timestamp and user-specific content
  await expect(page).toHaveScreenshot('product-page.png', {
    mask: [
      page.locator('[data-testid="timestamp"]'),
      page.locator('[data-testid="user-greeting"]')
    ]
  });
});
Output:

3. Cross-Browser Testing
Ensure consistency across different rendering engines:
javascript
// playwright.config.js
export default {
  projects: [
    { name: 'chromium', use: { ...devices['Desktop Chrome'] } },
    { name: 'firefox', use: { ...devices['Desktop Firefox'] } },
    { name: 'webkit', use: { ...devices['Desktop Safari'] } },
  ],
};
Output:

How to choose a Visual Regression Testing Tool?
-
Integration Simplicity Your tool should play nice with your existing stack. When you are using Jest, Cypress or Playwright, you may seek tools that have no-code integrations.
-
Cross-Platform Support Don’t just test on Chrome. All your users do not use the same browser and your tests should not, either.
-
Intelligent Comparison Find the tools that will allow you to differentiate between the significant changes and noise in rendering. Anti-aliasing differences shouldn’t break your build.
Popular Tool Comparison:
| Tool | Best For | Integration | Cloud Support |
|---|---|---|---|
| Percy | Teams wanting comprehensive visual testing | CI/CD pipelines | Yes |
| Chromatic | Storybook users | Component testing | Yes |
| Playwright | End-to-end testing suites | Built-in | Self-hosted |
| Backstop JS | Budget-conscious teams | Custom setups | No |
Types of Visual Regression Testing
1. Automation-Based Visual Regression Testing
Visual regression testing can be subsequently separated in two ways, based on its method: manual and automated. Today in a development pipeline at large, automated testing is a common practice, especially in CI/CD processes.
With this practice, teams may not always pick up minor aesthetic discrepancies, but it is fast, scalable, and an effective approach for identifying discrepancies that are militantly visible in UI breaks.
2. Scope-Based Testing
When we consider the range of tests that regression testing can cover, visual regression testing can be split up into full-page tests, component tests, and cross-browser tests. Full-page tests will capture and compare full webpages.
The toughest part about full-page tests is that dynamic content, such as rotating banners or including a timestamp on a webpage, brings in that element of flakiness.
3. Timing-Based Visual Regression Testing
Visual tests can grouped in a number of ways, including when testing is actually happening: the three main types are build-time, scheduled, and on-demand.
This type of testing is useful when testing particular features or during urgent bug fixes, or during large design changes when it matters to get feedback immediately
To know about Regression Testing Tools, Visit: https://keploy.io/blog/community/unit-testing-vs-regression-testing#regression-testing-tools
Visual Regression Testing (VRT) Tools –
-
Applitools Eyes: Applitools is an AI-driven smart visual testing tool that identifies visual differences. It is suitable for smart baseline management, dynamic content blocking and can easily be integrated with such frameworks as Selenium, Cypress and Playwright.
-
Percy (by BrowserStack): Percy is a popular VRT automation that executes visual tests on each pull request. It takes screenshots, contrasts them with the initial one, and points out any visual alteration visible in it and it is very simple to have teams review any UI change before reaching the people.
-
BackstopJS: BackstopJS is an open-source tool that’s highly customizable. It supports responsive design testing with different screen sizes, and it also gives pixel-perfect comparisons. Suitable to teams that want a free and flexible solution.
-
Chromatic: Designed and developed with the users of a Storybook in mind, Chromatic allows you to visually testing within the component scope. It assists teams in handling versioning of UI and to easily trap regressions and automates workflows of the frontend.
-
LambdaTest: LambdaTest is a cloud-based technology that provides a visual testing solution. It is made for teams interested in running UI tests on large amounts of different browsers and devices, without local setups.
Features of Visual Regression Testing Tools
-
Automatic Screenshot: Capture Automatic taking of screenshots is one of the main characteristics of any visual testing tool. Regardless of whether you are testing a whole page or even a single element of the page, these tools acquire the UI in various states/breakpoints without human intervention.
-
Pixel-by-Pixel Image Comparison: This is where the magic happens. The visual regression tools are used to compose new screen captures with those that were accepted in the past (so-called baselines). When something changes, even slightly by a few of pixels, it is flagged by the tool. In the majority of the tools, colour disparities are also signalled, and you can notice it in a minute.
-
Baseline Image Management: Better tools not only compare images, but they will also allow you to control them. When visual changes are anticipated (such as a redesign), you can accept the differences, update the new baseline and maintain a history ideal while the changes occurred.
-
Cross-Browser and Device Testing: UI may perfectly work in Chrome and go bad in Safari or on mobile. Most visual testing tools cover multiple browsers and devices and allow you to detect rendering trickery early.
How to Record API Calls with Keploy Extension?

Keploy provides a Chrome Extension that helps capture API calls while you interact with a website and automatically generate test cases from them.
Instead of writing API test cases manually, you can simply:
-
Open the Keploy Chrome Extension while browsing your application.
-
Perform actions on your web app (like navigating between pages, adding items to a cart, or submitting forms).
-
The extension will capture all API calls (XHR/Fetch) made during those interactions.
Once captured, Keploy generates structured API test cases (YAML format) along with mocks of backend responses, so you can replay them consistently in your local or CI/CD environment.
This is particularly useful when your web application sends API calls in the background, and you want to test both the correctness and reliability of those calls.
To know more, Keploy Chrome Extension: Check out here
Benefits of Visual Regression Testing Tools
Suppose you want to change the button theme in the CSS of your application. Everything seems fine functionally – the button works. However, in doing so, the padding is changed and text does not sit well on the smaller screens anymore.
In addition, with this early detection, expensive bugs in production are reduced, the review cycle is faster and your interface is on the same level as the design expectations.
The next underestimated advantage is the way such tools facilitate bringing design consistency to teams. Combined with such tools as Keploy, which manages test data and API mocking.
Combined with visual regression testing tools, it forms a very strong feedback loop: you get to test not only what the app may be doing, but also what it may appear like.
How Do Visual Regression Testing Tools Integrate with CI/CD Pipelines?

-
Parallel Functional Testing
Although visual testing only verifies the layout problems, the tools with API behaviour can be tested and all the issues associated with the testing are recorded (Keploy).
-
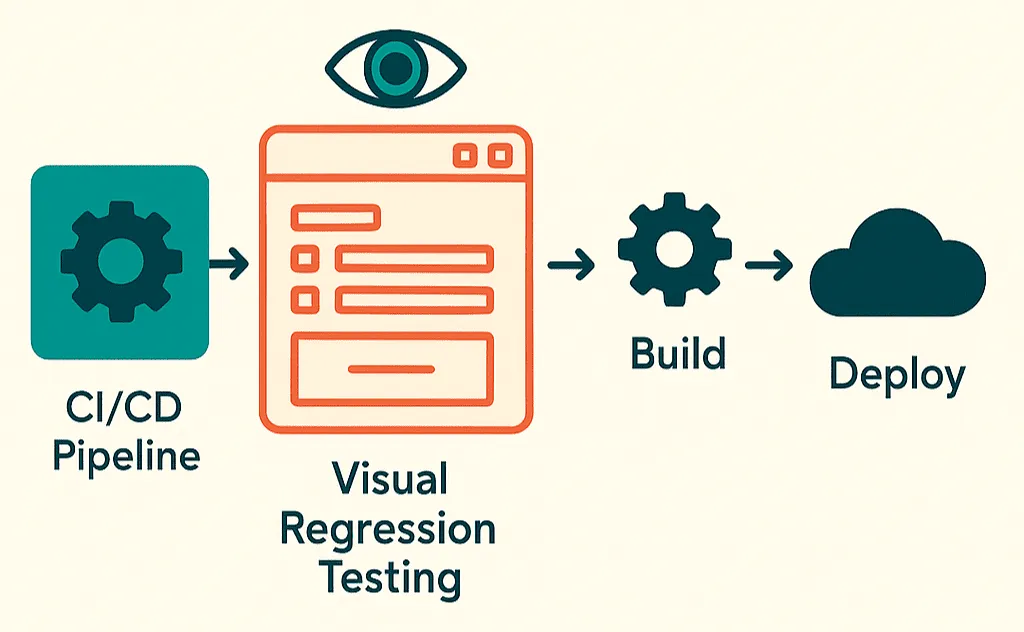
Pipeline Kickoff
This is triggered once a developer creates a pull request or a push commit. Your CI/CD runner (GitHub Actions, GitLab CI, Jenkins, or Circle CI in particular) understands. -
Environment Setup & Build
It is created and deployed in an environment that can be tested (frequently with a headless tested browser). This enables the visual regression tool to access real pages or parts as a user appears.
-
Screenshot Generation
The tool scans your app and takes new screenshots of new individual elements of UI or completely new pages. These screenshots reflect the existing states of the application as post-code change.
-
Baseline Comparison
Every new screenshot is pixel-wise compared to a so-called baseline image a screenshot of the previous build with no errors. Any deviations, no matter how small, are flagged.
-
Visual Diffs & Highlighted Changes
A potential case of mismatch results in the tool to generate a so-called visual diff: a representation of what changed in a side-by-side comparison (with highlights).
Conclusion
It is not only about aesthetics; visual regression testing tools are about trust. They make your product look reliable, consistent and professional on each deployment. When product is the user interface, there is no place to compromise on visual quality. With the ability to incorporate these tools into your CI/CD pipeline as well as complement them with the powerful Keploy automated test generation and API testing and validation, you can enjoy the best of both worlds.
Related Blogs :
Frequently Asked Questions (FAQs)
1. What exactly does a visual regression test do?
A visual regression test captures screenshots of your application and compares them with baseline images from previous versions. This helps identify unintended visual changes or UI bugs before they reach production
2. Can visual testing handle responsive design checks?
Yes, most modern visual testing tools can simulate different screen sizes and devices. This ensures your application’s layout, components, and content adapt correctly across all viewports.
3. How do I stop minor changes (like timestamps) from causing test failures?
You can exclude dynamic elements like timestamps using ignore regions or selectors in the tool’s configuration. Additionally, setting pixel difference thresholds helps reduce false positives caused by minor or insignificant changes.
4. Do these tools slow down my pipeline?
They can add some time, but with parallel testing and good configuration, the impact is minimal—and the bugs you catch early make it worth it.
5. How do visual regression tests handle microservices-based architectures?
In microservices setups, frequent API changes can cause flaky tests. Pairing visual tests with API mocks from Keploy ensures frontend UI tests remain stable, even if backend services are being updated independently.


Leave a Reply